
Building a Bluetooth-controlled robotic car is one of the most exciting projects for beginners in robotics and electronics. It’s a hands-on way to learn how to work with Arduino, motors, and Bluetooth communication while creating something cool that you can control with your smartphone! Whether you’re a beginner or just looking for a fun weekend project, this guide will walk you through everything you need to know to get your very own Bluetooth-controlled robot on the move.
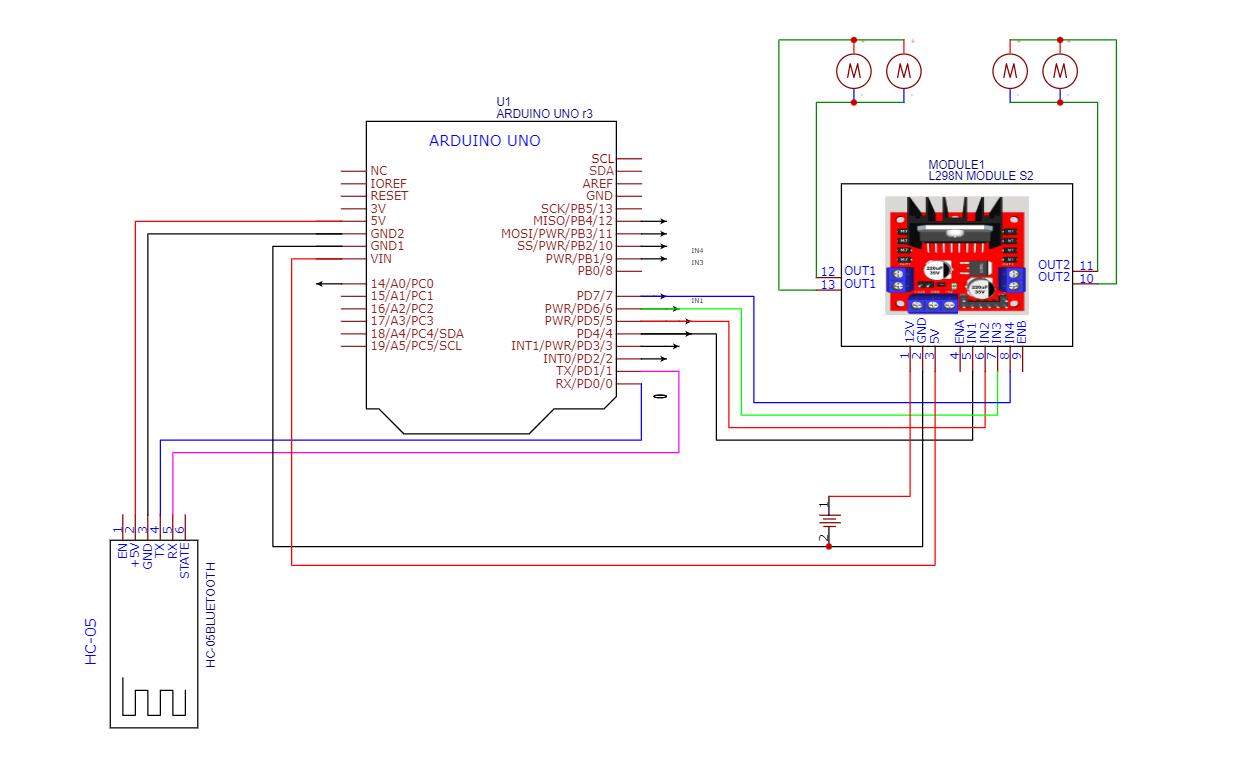
Components Required:
- Arduino Uno
- L298N Motor Driver Module
- HC-05 Bluetooth Module
- BO Motor*4
- Wheels
- Jumper Wire
- Battery
Circuit Diagram:
Code:
char data; // Variable to store received data

void setup() {
  Serial.begin(9600); // Start serial communication at 9600 baud rate

  // Set motor control pins as output
  pinMode(7, OUTPUT);
  pinMode(6, OUTPUT);
  pinMode(5, OUTPUT);
  pinMode(4, OUTPUT);

}

void loop() {
  if (Serial.available() > 0) {
    data = Serial.read(); // Read received data

    // Control motor movement based on received data
    switch (data) {
      case 'F': // Move Forward
        digitalWrite(7, HIGH);
        digitalWrite(6, LOW);
        digitalWrite(5, HIGH);
        digitalWrite(4, LOW);
        break;
      case 'B': // Move Backward
        digitalWrite(7, LOW);
        digitalWrite(6, HIGH);
        digitalWrite(5, LOW);
        digitalWrite(4, HIGH);
        break;
      case 'L': // Turn Left
        digitalWrite(7, LOW);
        digitalWrite(6, HIGH);
        digitalWrite(5, HIGH);
        digitalWrite(4, LOW);
        break;
      case 'R': // Turn Right
        digitalWrite(7, HIGH);
        digitalWrite(6, LOW);
        digitalWrite(5, LOW);
        digitalWrite(4, HIGH);
        break;
      case 'S': // Stop
        digitalWrite(7, LOW);
        digitalWrite(6, LOW);
        digitalWrite(5, LOW);
        digitalWrite(4, LOW);
        break;
    }
  }
}
Test and Control with Your Smartphone
Once you’ve uploaded the code to your Arduino, it’s time to test it out. Pair your smartphone with the Bluetooth module (using a Bluetooth app such as Bluetooth Terminal or any custom app that allows serial communication). Open the app, connect to the HC-05/HC-06, and start sending commands like ‘F’, ‘B’, ‘L’, ‘R’, and ‘S’ to control the robot’s movements.
More Projects
-
Audio Level Indicator – VU Meter
The VU meter—short for “volume unit meter”—is a device used to measure the average level of audio signals in terms of their loudness. It visually indicates the intensity of sound …
-
Powerful Audio Amplifier Using cd4440
Welcome to our latest video where we delve into the fascinating world of audio amplification using the CD4440 IC! In this comprehensive guide, we’ll walk you through the step-by-step process …
-
Building an Automatic Dark Sensor with BD139 Transistor
Light and darkness are two sides of the same coin, influencing our daily lives in ways we often overlook. Imagine a world where lights adjust themselves according to the ambient …