
Have you ever wished your dustbin could open its lid automatically when you come near? In this DIY project, I’ll show you how to build a simple yet effective Smart Dustbin using an Arduino, ultrasonic sensor, and a servo motor.
This is a fun project for beginners and hobbyists that not only makes your home smarter but also teaches you about distance sensing and servo control.
Let’s get started! 👇
Component Required:
- Bucket
- Cardboad
- Servo Motor
- Arduino Uno
- Ultrasonic sensor
- 9v Battery
- Jumper Wire
Circuit Diagram:
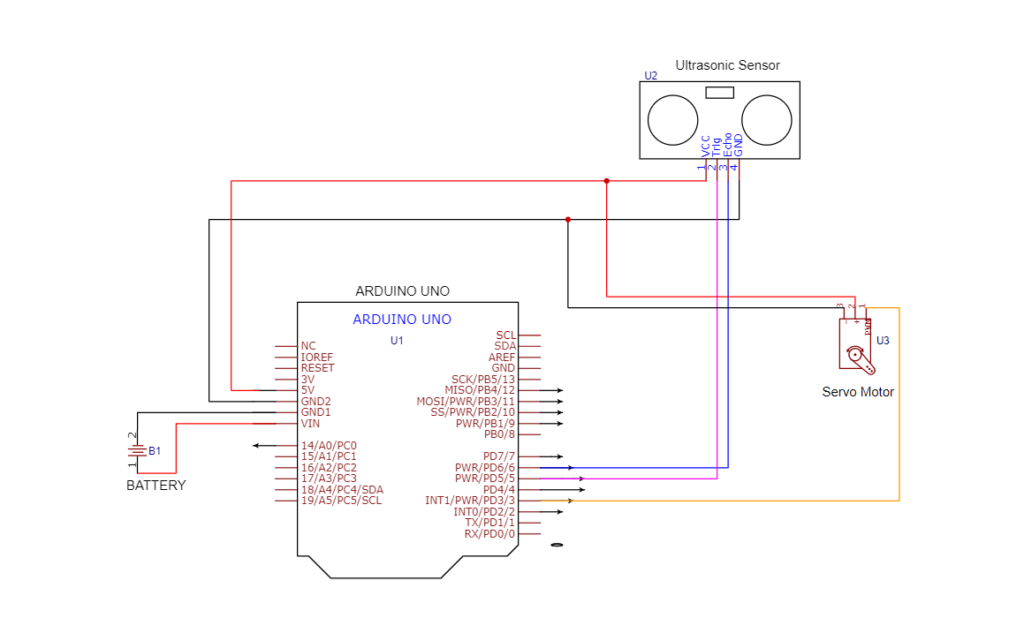
Connections:
| Component | Arduino Pin |
|---|---|
| Ultrasonic Trig | D5 |
| Ultrasonic Echo | D6 |
| Servo Signal | D3 |
| LED (+) | D10 |
| LED (-) | GND |
| Ultrasonic VCC | 5V |
| Ultrasonic GND | GND |
| Servo VCC | 5V |
| Servo GND | GND |
How It Works
- The ultrasonic sensor continuously measures the distance in front of the dustbin.
- If it detects an object (like your hand) within 5 to 30 cm, the Arduino sends a signal to the servo motor to open the lid.
- After 5 seconds, the lid automatically closes.
- An optional LED lights up when the lid is open.
Code:
#include <Servo.h>

Servo servo;

int trigPin = 5;
int echoPin = 6;
int servoPin = 3;
int led = 10;

long duration, dist, aver[3];

bool isOpen = false;
unsigned long openTime = 0;

void setup() {
  Serial.begin(9600);
  servo.attach(servoPin);
  pinMode(trigPin, OUTPUT);
  pinMode(echoPin, INPUT);
  pinMode(led, OUTPUT);

  closeLid();  // Close lid on power up
}

void measure() {
  digitalWrite(trigPin, LOW);
  delayMicroseconds(5);
  digitalWrite(trigPin, HIGH);
  delayMicroseconds(15);
  digitalWrite(trigPin, LOW);

  duration = pulseIn(echoPin, HIGH, 30000); // 30ms timeout
  if (duration == 0) {
    dist = 500; // No object detected
  } else {
    dist = (duration / 2) / 29.1;
  }
}

void loop() {
  // Take average of 3 readings
  for (int i = 0; i <= 2; i++) {
    measure();
    aver[i] = dist;
    delay(10);
  }
  dist = (aver[0] + aver[1] + aver[2]) / 3;

  Serial.println(dist);

  // Open only if distance between 5cm and 30cm
  if (dist > 5 && dist < 30 && !isOpen) {
    openLid();
    openTime = millis();
    isOpen = true;
  }

  // Close after 5 seconds
  if (isOpen && (millis() - openTime > 5000)) {
    closeLid();
    isOpen = false;
  }

  delay(100);
}

void openLid() {
  digitalWrite(led, HIGH);
  servo.write(0);  // Adjust angle if needed
}

void closeLid() {
  digitalWrite(led, LOW);
  servo.write(150);  // Adjust angle if needed
}
More Projects
-

Building an Automatic Dark Sensor with BD139 Transistor
Light and darkness are two sides of the same coin, influencing our daily lives in ways we often overlook. Imagine a world where lights adjust themselves according to the ambient light—a realm where darkness triggers illumination automatically. Such a world isn’t far-fetched, and with the BD139 transistor, creating an automatic dark sensor becomes an exciting…
-

Servo Motor Controller Circuit
A servo motor controller circuit is an electronic system designed to control the position, speed, and direction of a servo motor. Servo motors are used in various applications, including robotics, automation, and precision control systems. The controller circuit typically receives control signals (often from a microcontroller or external controller) and adjusts the servo motor’s movement…
-
Amazing LED Chaser Circuit – Beautiful Decoration Idea
An LED chaser is an electronic circuit that lights LEDs one after another in a sequence. It creates a running or chasing light effect commonly seen in decorations and indicators. The sequence can move left-to-right, right-to-left, or in patterns. It’s usually built using ICs like 555 timer + 4017 decade counter. Components Required: Circuit Diagram:…