
The world of electronics is filled with exciting projects, and one that stands out for its simplicity and visual appeal is the Arduino 10-LED Chaser Circuit. This project combines programming and hardware to create a mesmerizing light display. In this blog post, we’ll guide you through the process of building your own 10-LED chaser circuit using Arduino.
Materials Needed:
- Arduino board (e.g., Arduino Uno)
- 10 LEDs
- 1 x 220-ohm resistors
- USB cable for Arduino
- Arduino IDE (Integrated Development Environment) installed on your computer
Circuit Connection:
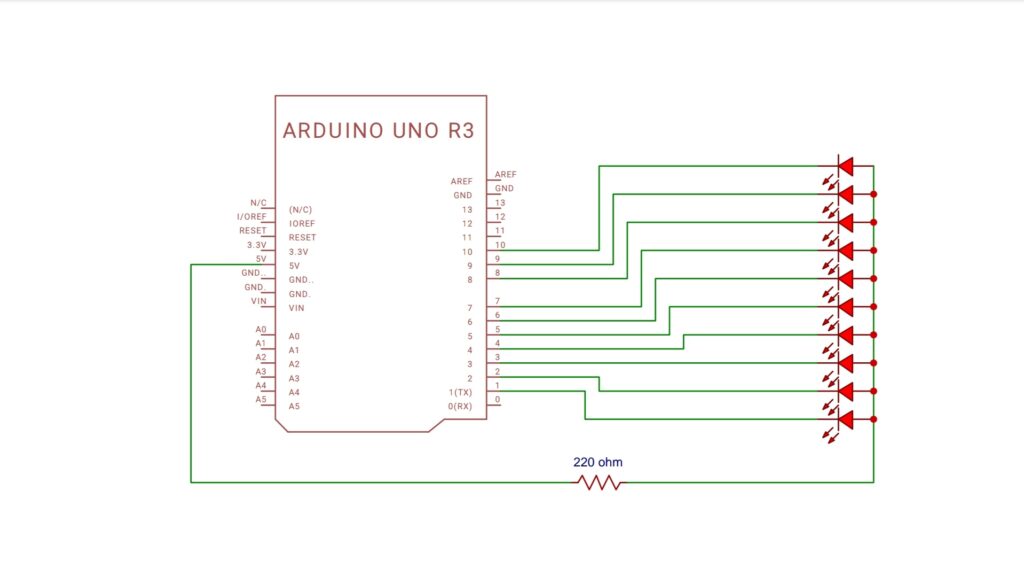
- Connect the anode (long leg) of each LED to copper wire
- Connect the Cathode (short leg) of each LED to digital pins 1 through 10 on the Arduino board.
- Connect the 220 ohm resistor in copper wire for all the LED and on other end of resistor connect 5v supply of arduino uno.
- Open the Arduino IDE on your computer and write the code for the LED chaser. Below is a simple example code in Arduino programming language:
Circuit Diagram:
Code:
// Number of LEDs
const int numLEDs = 10;

// Array to store pin numbers
int ledPins[] = {1, 2, 3, 4, 5, 6, 7, 8, 9, 10};

void setup() {
// Set all LED pins as OUTPUT
for (int i = 0; i < numLEDs; i++) {
pinMode(ledPins[i], OUTPUT);
}
}

void loop() {
// Turn off all LEDs
for (int i = 0; i < numLEDs; i++) {
digitalWrite(ledPins[i], LOW);
delay(50);
}

// Turn on all LEDs
for (int i = 0; i < numLEDs; i++) {
digitalWrite(ledPins[i], HIGH);
delay(50);
}
Explanation of the Code:
The ledPins array holds the digital pin numbers connected to each LED.
In the setup function, we set all LED pins as outputs.
The loop function turns on and off each LED in sequence, creating the chasing effect.
Upload the code to your Arduino board by selecting the correct board and port in the Arduino IDE and clicking the upload button.
Conclusion:
Congratulations! You’ve successfully built an Arduino 10-LED chaser circuit. This project is a fantastic way to learn about basic electronics, programming, and the seamless integration of hardware and software. Experiment with the code, customize the speed of the LED chase, and explore other Arduino projects to further enhance your skills in the world of DIY electronics. Happy tinkering